Clayborn Lab - A World of applications

Aerospace
Satellites, Vacuum Chambers, Testing, Laboratory
Automotive
Fuel Cell Development, Cold Chamber testing
Construction
Concrete Curing, Ground Thaw, Hot Box Heater
Composites
Adhesive Application, Epoxy Transfer, 2-part Spray
Environmental
EPA-required Testing, Solar, Biofuel Development, Diesel Emissions
Food Industry
Viscosity Control, Production Technology
Gas Samples
Emission Testing, Stack Samples, Analyzer Components, Field Tests
Government
International Space Station, Meteorological Analysis
Industrial
Machinery, Systems Engineering, Semiconductors
Laboratory
Thermal Testing, Non-Condensate, Instrumentation, Electron Microscopes
Medical
Flow Control, Instrumentation, Scientific Research, Optical Resolution
Pharmaceutical
Production Machinery, R&D, Test
Transportation
Train Car Defrost System, Aviation Freeze Protect, Tank Batteries
University
Mechanical, Chemical, Electrical
How To
How to Install Terminals and Make Heating Tape Connections
 Download PDF
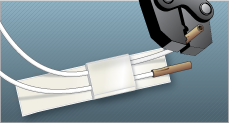
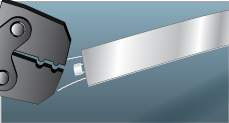
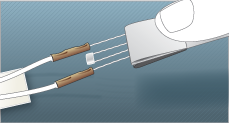
1. Push lead wires through terminal block holes. Strip lead wire ends and crimp butt connectors onto lead wires.
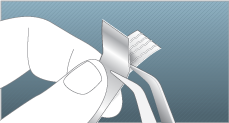
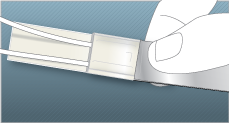
2. Split tape and open using tweezers. Dull tweezers are better than very sharp tweezers.
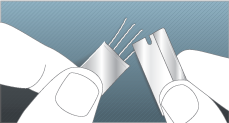
3. Cut back top and bottom laminations leaving wire ends exposed approx. 3/16" for small terminals and 1/4" for large terminals. Scrape enamel from wire ends using razor blade.
4. When using 4-wire tape in full series connection, crimp half of a #092 connector onto center 2 wires and trim short.

5. Crimp lead wires onto heaters. To avoid breaking, do not crimp heater wire too hard!
6. Strip paper liner back about 1" from tape lead end. Push terminal block over connectors.
7. Press heater tape onto self-adhesive terminal flap.
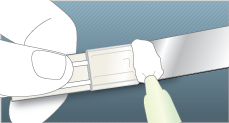
8. If desired, apply RTV Sealant (available from Clayborn) over terminal block end.